
If you clicked on this article, your are probably familiar with GitHub's Profile README feature, if not, here is a quick overview:
README.md file within a repository named exactly after your username. This file becomes the content of your public profile page, making it a great place to showcase who you are, what you’re working on, or anything else you'd like to share. If you'd like to see an example, feel free to check out my GitHub profile.Why is this so important?
The first thing people see when they visit your GitHub profile is your README. Think of it as your digital business card, portfolio, and elevator pitch all in one. You might be thinking, "I’m not trying to sell anything, so why should I bother?" But the reality is that your profile README matters more than you might think.
Whether you’re actively looking for a job, contributing to open-source projects, or building a presence in the developer community, everyone who visits your profile sees your README: potential employers, collaborators, recruiters, contributors, and curious developers who found your project. It's an opportunity to show who you are, what you’re passionate about, and what you’ve built.
A well-crafted README adds personality and provides context, making your work stand out in a sea of code. It shows that you care about presentation and communication, which are valuable skills in their own right.
What should I include in my README?
Although there are no strict rules for what your profile README should look like, there are a few key elements that can help you make the most of it. Think of it as a highlight reel of not just your projects, but also you as a developer.
Here are some things you might want to include:
- A short introduction: Who are you? What do you do? What are you passionate about?
- Your current focus: What are you learning, building, or working on right now?
- Pinned projects or achievements: Highlight repositories you’re proud of, personal projects, or contributions to open source.
- Tech Stack: List the languages, frameworks, and tools you’re comfortable with.
- Contact and links: Make it easy for people to connect with you. Include your GitHub, LinkedIn, portfolio, blog, and email.
- Optional: Fun facts or personality. A little personality goes a long way. Include hobbies, a fun quote, or a personal motto to make yourself more memorable.
You don't have to include everything, nor do you have to be overly formal. Keep it authentic and relevant, and remember: This is your space to represent yourself however you want.
How do I write my README?
Writing your profile README is easier than it seems. Since GitHub supports Markdown, you can use simple syntax to format your text with headings, lists, links, images, and more. If you’re already familiar with Markdown, you can start writing directly in GitHub or your favorite code editor.
If you're not comfortable with Markdown or want a faster way to get started, there are great tools available, for example readme.so, with an easy drag-and-drop interface that helps you build a README without writing a single line of Markdown by hand.
Not sure where to begin? One way to spark ideas is to look at other developers profile READMEs. Explore GitHub, check out profiles you admire, and see how others present themselves. You'll quickly get a feel for what's possible and what feels right for your profile.
How to automate your README?
Now that you've created a strong and personal GitHub README, wouldn't it be great if some parts of it could update themselves? No more manually editing to showcase your latest project, contribution, or blog post! That’s where automation comes in.
Why is automation useful?
Your README represents you, but it can easily become outdated if you don't update it regularly. Automating parts of your README helps keep it fresh and relevant by reflecting your recent activity without requiring manual edits.
Automation is especially helpful if you:
- Contribute to repositories regularly
- Write blog posts or tutorials
- Publish packages, libraries, or other content
- Want a “living” profile that shows what you’re up to?
Using it also demonstrates your understanding of DevOps concepts like CI/CD.
Example Use Cases:
- 📝 Show your latest blog posts
- 💻 Display your most recent GitHub activity
- 📊 Add dynamic GitHub stats or contribution graphs
- 🎥 Embed your latest YouTube videos
- 🧠 Rotate between random quotes, tips, or fun facts
- ⏱️ Show your current timezone, weather, or coding streak
- 🗂 List recent contributions to other repos
All of this and more is possible with just a bit of automation.
Ways to automate your README
There are two main ways to add dynamic content to your README:
Option 1: External Tools That Render Images
These services generate images reflecting live data, such as GitHub stats, WakaTime summaries, and streak counters. You can embed them using a standard Markdown image tag.
Pro:
- Very easy to integrate, just copy and paste a link
- No need for GitHub Actions or coding experience
- Useful for visual stats like graphs and dashboard
Cons:
- Limited to the content the service provides
- Less flexible in formatting and layout
- Images may fail to load or be rate-limited
- Can't blend seamlessly into your written content
Option 2: GitHub Actions with Markdown Control
This approach gives you full control. A GitHub Action runs on a schedule (e.g., once a day), fetches data from an API or your GitHub activity, and writes formatted Markdown directly into your README.
Pros:
- Fully customizable, you decide what to show and how
- Works well with structured content (like lists or timelines)
- No reliance on external image services
- Demonstrates automation skills and CI/CD knowledge
Cons:
- Requires basic understanding of YAML and GitHub Actions
- Slightly more complex to set up
- May require personal access tokens or secrets depending on what you fetch
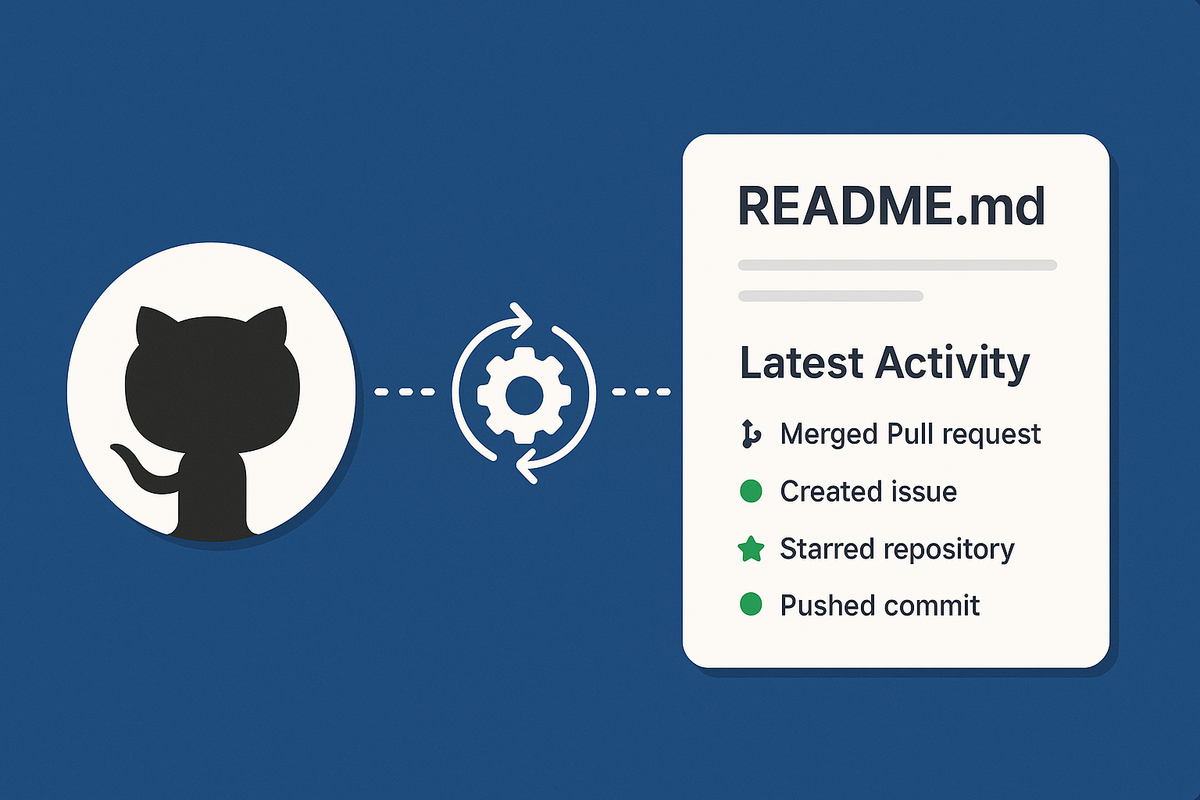
Example: Automatically Display Your Recent GitHub Activity
Let's say you want to show your most recent GitHub contributions, such as new repositories, pull requests, and stars. One way to do so is to write a custom workflow. However, if you're looking for a faster solution, activity-log is a ready-to-use GitHub action that can do this for you.
It updates your README with your latest public GitHub events and supports filtering event types, limiting number of events, and formatting them as Markdown or HTML.
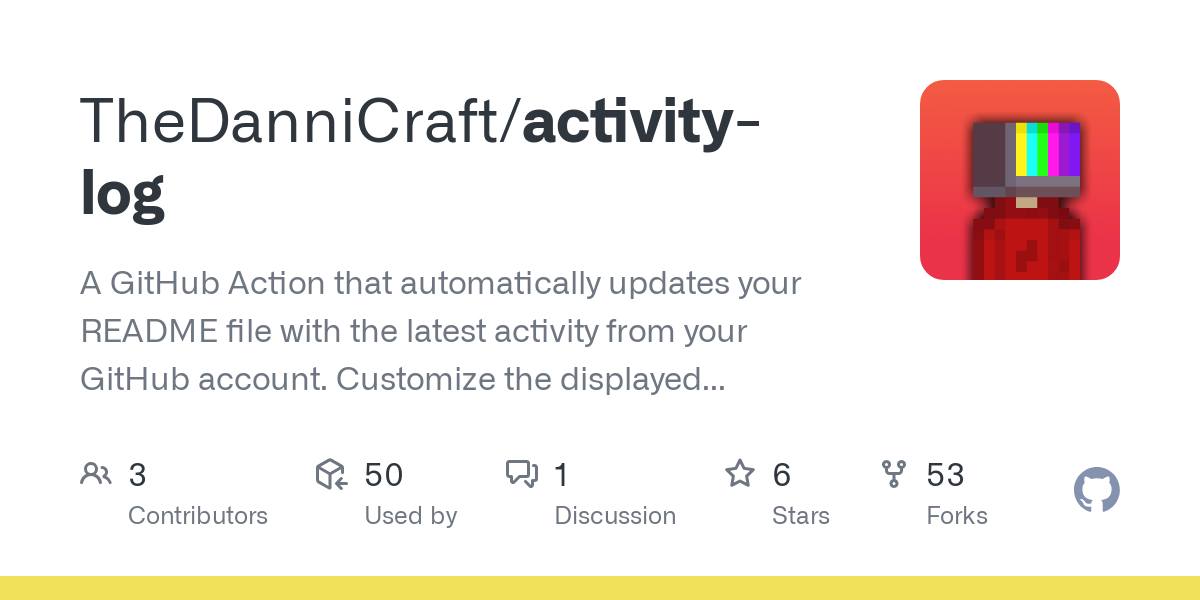
A GitHub Action that automatically updates your README file with the latest activity from your GitHub account.
Here’s how you can do it:
- Include the following placeholders in your
README.mdwhere you want the activity log to appear:
<!--START_SECTION:activity-->
<!--END_SECTION:activity-->- Obtain a GitHub Personal Access Token (PAT)
In order for GitHub Actions to fetch events from private repositories or update your README on your behalf, you will need a Personal Access Token (PAT). Essentially, this is a secure password that your workflow uses to authenticate with GitHub.
- Click the button below to quickly pre-fill the required name and scopes:
- Set the expiration date to when the token should expire ("Never" is recommended)
- Click "Generate Token" and copy the token. Be sure to save it because you won’t be able to see it again.
Prefer doing it manually? Check the full guide in the activity-log repo.
- Add the Token as a Repository Secret
Now that you’ve created your token, store it securely in your repository so GitHub Actions can use it:
- Navigate to your GitHub repository.
- Go to "Settings" > "Secrets and variables" > "Actions".
- Click "New repository secret".
- Name the secret (e.g.,
TOKEN). - Paste the personal access token into the value field.
- Click "Add secret".
secrets.<SECRETNAME>,where
SECRETNAME is the name of your secret (e.g. secrets.TOKEN).They’re never exposed in logs by default.
- Create your workflow file
Create a new file in your repository under .github/workflows/, for example, update-readme.yml. Add the following content to this file:
# .github/workflows/update-readme.yml:

name: Update GitHub Activity

on:
  schedule:
    - cron: "*/30 * * * *" # Runs every 30 minutes
  workflow_dispatch: # Allows manual triggering

jobs:
  update-activity:
    runs-on: ubuntu-latest
    steps:
      - uses: actions/checkout@v4
      - name: Update GitHub Activity
        uses: TheDanniCraft/activity-log@v1
        with:
          GITHUB_USERNAME: "thedannicraft"
          GITHUB_TOKEN: ${{ secrets.TOKEN }} # Ensure this matches the secret name in repository settings
Your workflow is now set to run every 30 minutes automatically, or manually if you trigger it via the GitHub Actions tab.
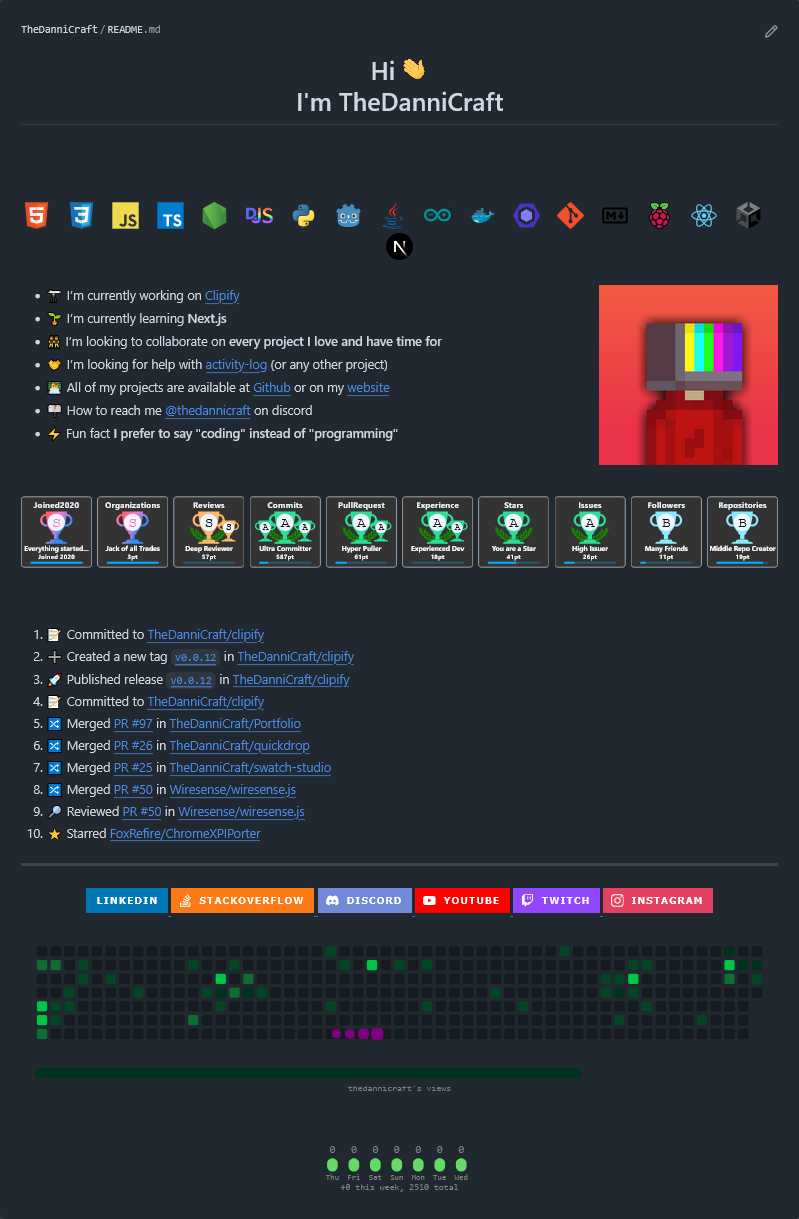
Here's an example of what a dynamic GitHub README can look like, checkout live version here:
That's all for today! Automating your GitHub README is a small step that can make a big difference. It keeps your profile fresh and reflective of your work, giving it a bit more of your personality. Whether you keep it minimal or go all out with custom workflows, it's your space, make it count!
If you've automated your profile using this guide or already have a great README, share a link in the comments. Share inspiration for others and discover awesome new profiles!


Member discussion: